Monday, March 31, 2008

Paper Crafts Wallpaper Fan

Make a pretty wallpaper fan to accent a bedroom or bathroom mirror, or as a wall hanging to add color to any room...............


Wallpaper Fan


What You Will Need;

  • wallpaper scraps or wallpaper border (paper fan shown above left was made with a border 27" long by about 10" highlgfan (8K)
  • pregathered lace trim
  • ribbon
  • silk flowers

  • clothpins
  • hotglue or tacky glue .

Wallpaper Fan


Instructions:

Fold the fan accordian-style, using a 1/2" pleat. You can measure and mark half inch lines on the back to use a folding guide. Or you can take your time and concentrate on keeping each pleat the same size as the one before. Either method will work, but remember the objective is to keep the folds exactly the same size.

fan_detail (27K)If the end of your fan shows the back of the paper at the front of the fan, then cut off the last fold; you only want the front of the paper to show on the finished fan.

Pinch the fan together with your fingers at the bottom edge. By gently opening the rest of the fan you should be able to form a half circle shape. Use the clothes pin to keep the bottom edge together while you work the glue gun.

Working on the back, carefully place the tip of the glue gun between each fold, and use just a small dab of hot glue to secure in place. Reinforce with more glue, if needed, running a bead of glue near the bottom of the pleats that you just finished gluing, and along the bottom edge where all the pleats come together. Be careful not to burn your fingers!

Now refer to the photos for decorating ideas. Two styles are shown: one has four large silk flowers clustered in the bottom center of the fan, embellished with green and white ribbon. The other style, as shown in this larger photo, has off-white mock-orange blossoms and buds climbing up from the center to the left. This is the fun part! Make use of the tops of silk flowers left over from other arrangements or try dried flowers. Set your selection in place without glue first to decide how you best like the arrangement.

Add a length of co-ordinating pregathered lace to the top of the first crease at the base of the fan. Just run a very thin bead of hot glue along the top of the crease for a few inches, then press the top of the lace in place. Repeat until the lace is glued all along the bottom.

Suggestions:

These would make beautiful wedding decorations. The variations are really endless. Try adding lace to the top edge by gluing in place before folding the pleats. Scallop the top edge of your wallpaper before folding, or add sparkle with glitter glue.

Thursday, February 28, 2008

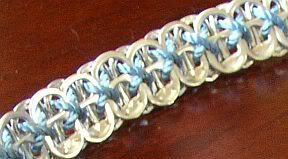
Can Tab Belt

Directions For The Belt.


I collected 200 tabs, raiding my neighbors recycling bins in the dark of night, and ended up using 125-150 of them. I bought 5 yards of nylon cord and used all of it. It took 60-90 minutes to make.
First I found the center point of the cord and tied a knot about 8 inches in.


I then threaded my first can tab on, I consider this the front.


I threaded on my second tab whick will be the back of the belt. I put rough edges facing in toward each other.


this is the back view


I then put on the second "front" tab crossing the cord to make an x....like cross stitch


The back view of this step


Thread the second "back" tab on


Come up through the holes on the front tab


Continue by doing the cross stitch on front


Voila!

Photobucket - Video and Image Hosting


Photobucket - Video and Image Hosting


I hope this is helpful. Once you get the hang of it it goes quickly.....and is addictive. You've been warned.
thankyou...

how to make paperbag book


Paperbag Book Tutorial

Supplies needed:

Lunchbags, stapler, glue stick, paper trimmer, scissors, glue dots, decorative paper, ephemera.

For a six page book, use 3 paperbags. Alternate the opening of the bags and stack them on top of each other.


Fold the bags in half.


Now you can pull out your sewing machine and sew up the middle, or do it the fast and speedy way and staple the center. I like fast and speedy.


Pull out all your collage and scrapbook supplies. This is where the fun begins.


I cut a piece of decorative paper to cover the spine of the book and glue it on with a glue stick. I've tied riboons around the spine on this book. You can also punch holes and thread yarn and ribbons through.
Now you can turn this into anything you want. I mailed cds to a friend using the bag openings to hold the cds. You can use this as a photo book, an art book, keep recipes or decorating ideas in it. Whatever you want!


Friday, November 30, 2007

World-Smallest Electric Guitar


World-Smallest Electric Guitar And it is _interesting
This one has 1/6 size of the normal electric guitar, but still has 20 frets with wide fretboard to be fully playable.

The Sharpest View of the Sun


2002 November 14
Explanation: This stunning image shows remarkable and mysterious details near the dark central region of a planet-sized sunspot in one of the sharpest views ever of the surface of the Sun. Just released, the picture was made using the Swedish Solar Telescope now in its first year of operation on the Canary Island of La Palma. Along with features described as hairs and canals are dark cores visible within the bright filaments that extend into the sunspot, representing previously unknown and unexplored solar phenomena. The filaments' newly revealed dark cores are seen to be thousands of kilometers long but only about 100 kilometers wide. Resolving features 100 kilometers wide or less is a milestone in solar astronomy and has been achieved here using sophisticated adaptive optics, digital image stacking, and processing techniques to counter the blurring effect of Earth's atmosphere. At optical wavelengths, these images are sharper than even current space-based solar observatories can produce. Recorded on 15 July 2002, the sunspot shown is the largest of the group of sunspots cataloged as solar active region AR 10030.

Ten Rules for Being Human

1. You will receive a body. You may like it or hate it, but it's yours to keep for the entire period.
2. You will learn lessons. You are enrolled in a full-time informal school called, "life."
3. There are no mistakes, only lessons. Growth is a process of trial, error, and experimentation. The "failed" experiments are as much a part of the process as the experiments that ultimately "work."
4. Lessons are repeated until they are learned. A lesson will be presented to you in various forms until you have learned it. When you have learned it, you can go on to the next lesson.
5. Learning lessons does not end. There's no part of life that doesn't contain its lessons. If you're alive, that means there are still lessons to be learned.
6. "There" is no better a place than "here." When your "there" has become a "here", you will simply obtain another "there" that will again look better than "here."
7. Other people are merely mirrors of you. You cannot love or hate something about another person unless it reflects to you something you love or hate about yourself.
8. What you make of your life is up to you. You have all the tools and resources you need. What you do with them is up to you. The choice is yours.
9. Your answers lie within you. The answers to life's questions lie within you. All you need to do is look, listen, and trust.
10. You will forget all this.

/how-to-make-roses-from-maple-leaves/